Monday, September 30, 2019

Tuesday-Friday 24-27 September

Classes worked at different times on the following items. It is important to note that we reviewed the grading policy (below) as mid-terms are being posted Tuesday.

Also students were given a chance to use the table saw to cut a blank for their drill press demo (the storage shelf for ceramics). Students also had time to layout for the drilling, and many students have already demoed the drill press.

Students who have BOTH passed the test and successfully demonstrated proper use are now indpendent on the drill press. (Check the Test & Demo log, or synergy if you are not sure).

Students had time to sketch ideas for their holder.

Today students will be shown how to use a random orbit sander to finish sand the shelf for ceramics.


Grading and Grade Calculation:

Daily Career Related Standards: 60%
Each Student is eligible for 5 points each class period.
Unexcused absences will result in 0 points for the missed class.
1 point – On time; prepared with appropriate materials; appropriate clothing and footwear.
4 points – Working independently and collaboratively; following shop rules and protocols for safety and material use; using time efficiently. These standards are similar to our Generals Lead Philosophy of Live to Learn; Engage with Purpose; Advocate for Self and Others; and Demonstrate with Passion.

Final Projects and Academic Work: 20%
Major projects will be evaluated for evidence of following and implementing the plan, and for knowledge of the properties of the materials used.

Safety Tests: 10%
All students MUST pass the safety test and demonstration for each tool or machine that they use in the shop. Students may pass the tests in a variety of form; please see the instructor for options when needed. Students MAY use a machine under the direct supervision of the instructor before they pass the test and demo (in fact this is a great way to learn the proper procedures!). Tests and demos are based on proficiency and may be redone.


There is great info (and practice tests online) at Maucks.com/safety.

Note / Design Book: 10%
The note book should include basic knowledge; examples; protocols; procedures; as well as being a vital process of the design process.
Wednesday, September 25, 2019

Rack and Holder Examples; Working Drawing Views


The first step to making something is to have a plan for what you are 
making. For the Rack / Holder Project assignment you will need to submit Scale Working Drawings sufficient to be used to make your project. These drawings will need to include at least two views (front and side elevation; or front elevation and plan view).

HOWEVER
You should start your design work with LOTS of quick sketches for ideas. DO NOT start by trying to make a scale drawing of just one idea. Start with many sketches. You must show me at least three different ideas.

Then you will want to decide how big you would like your piece to be (you can have enough wood to make something up to about one board foot).  If you want more wood than that, your cost will be $3.00 per board foot. A board foot is a piece of wood 12"x12"x1" or any equivalent volume. What is the volume of a board foot of wood?

I will provide ¼" graph paper. A scale drawing will be pretty easy to produce using a ¼" scale such as ¼"=1" or ¼" = 2".


File:Architectural drawing 001.png
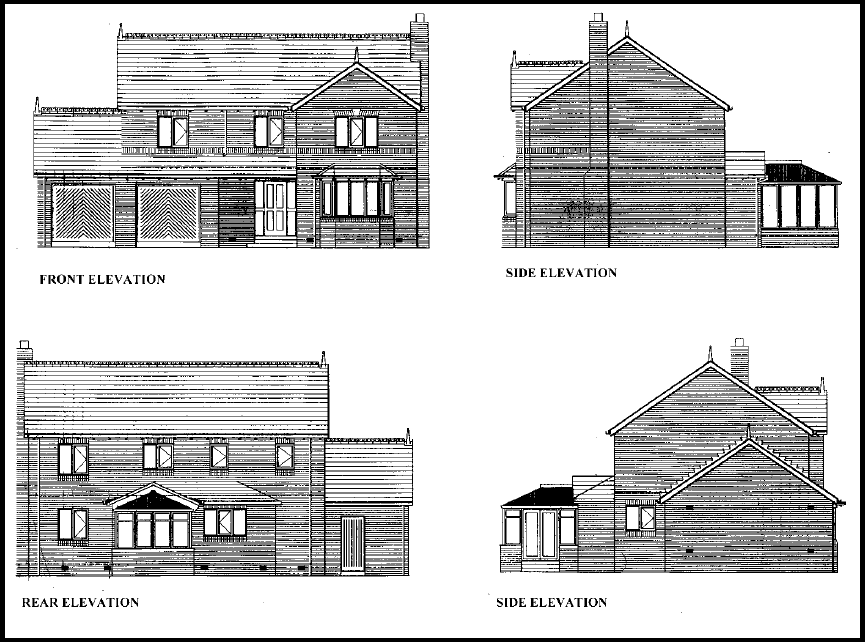
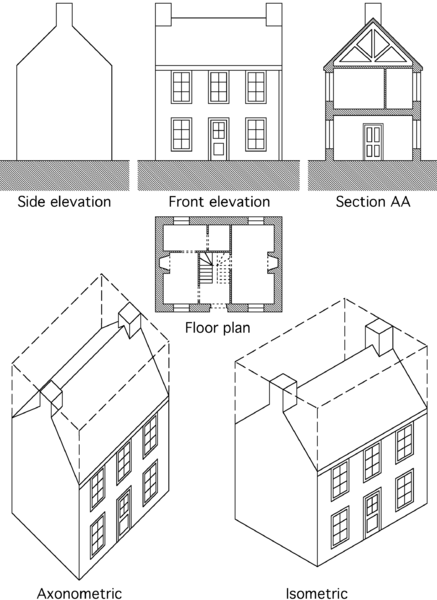
Here  are some classic examples of elevations and views for a typical piece of architecture.


The same idea can apply to machines (or anything one can build or imagine).

This abstraction may help you think about the idea more clearly.


Remember for this project you do not necessarily need to make three (or four, or more views), but you should choose the two that will best help you understand how your parts go together.


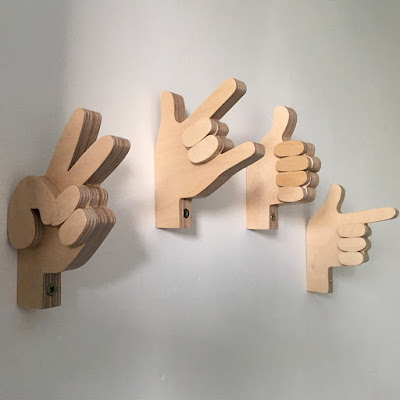
Here are some examples of racks and holders.


These following pictures represent the beginning of some more inventive ideas from an adult class I helped teach:


Tuesday, September 24, 2019

Back to School Night: WELCOME

(Not the new shop)
Welcome!

It's a delight to have you here in the Woodshop (aka room #145; aka "The Scene Shop") either in person or virtually.

One of the most important things you should come away with tonight is the address of this blog and my email address:


The most important thing you can take away with you is that my HIGHEST PRIORITY is:


THE SAFETY OF YOUR STUDENT


Classroom policies and procedures; a significant portion of the grading in this class; and our class ethos is rooted in safety.


Our Motto is: Carpenters Build Community!


Our Ethos is reflected in the phrase:


We work:
On Time;
On Budget;
According to Plan;
Safely;
Together.


Woods = CTE (Career and Technical Education)


Recent significant investments by the State and Federal Government (and leadership from Dr. Carol Campbell) allow us to give students experiences with real world work and problem solving.

This class is part of the Construction Trades field: Intro to Woods; Intermediate Woods and Construction; Advanced Woods and Construction; Architectural Drafting; and GeoTech, as well as Classroom Mentors and Technical Assistants are part of this program of study. We have a dream of offering boat building in the future, as well. Alex Luboff is the other CTE Certified Teacher.

Students earn a CTE Endorsement who complete Intro to Woods and Intermediate Woods (contrary to my recomendation the cord for this endorsement is not ⅜ inch braided steel).

Students who engage early can work with me to virtually assure themselves a slot in the Carpenters Union Apprenticeship Program.


However, this class is not just focused on helping create qualified candidates for the family wage jobs in Construction (or other trades), this class is a learning lab that teaches:


Problem Solving
Perseverance
Resiliency
Design Thinking
Materials Engineering
Manufacturing Processes
Job Readiness Skills

(... and some basic skills that may negate the necessity of hiring a skilled tradesperson for home repair and updates).

(And cleaning up --- 
though your results at home may vary.)


Projects


Students will be provided sufficient materials (and safety equipment) to complete all projects. If students do take care with their materials or wish to persue larger or additional projects a fee will be assessed. All students are required to submit a piece to the Art Show in the spring; they do NOT have                                                       to offer these pieces for sale.


Introductory Projects:
First: a rack for mugs; coats; jewelry
Second: A childrens toy with a moving part
Third: Cutting board


Intermediate Projects:
A mallet;
A box; 
A table.
Other projects for the community as assigned.


Advanced Projects:
Advanced students work with the instructor to design and build projects that teach them new skills and enable them to refine existing skills.


Customs speakers produced by Woods and
Audio Engineering Students with the assistance of
the Maker Space

Grading and Grade Calculation:

Daily Career Related Standards: 60%
Each Student is eligible for 5 points each class period. 

Unexcused absences will result in 0 points for the missed class.
1 point – On time; prepared with appropriate materials; appropriate clothing and footwear.
4 points – Working independently and collaboratively; following shop rules and protocols for safety and material use; using time efficiently. These standards are similar to our Generals Lead Philosophy of Live to Learn; Engage with Purpose; Advocate for Self and Others; and Demonstrate with Passion.

Final Projects and Academic Work: 20%
Major projects will be evaluated for evidence of following and implementing the plan, and for knowledge of the properties of the materials used.

Safety Tests: 10%
All students MUST pass the safety test and demonstration for each tool or machine that they use in the shop. Students may pass the tests in a variety of form; please see the instructor for options when needed. Students MAY use a machine under the direct supervision of the instructor before they pass the test and demo (in fact this is a great way to learn the proper procedures!). Tests and demos are based on proficiency and may be redone.


There is great info (and practice tests online) at Maucks.com/safety.

Note / Design Book: 10%
The note book should include basic knowledge; examples; protocols; procedures; as well as being a vital process of the design process.


Bubble Cabinet and dovetailed box by Zartler

Jamie Zartler
 a 27(?) year veteran of teaching studied fine wood working at North West Wood Working Studio as part of his path to CTE licensure after years of teaching English, Social Studies, and a couple of other things. He currently has all ten fingers (and plans to keep it that way.)

He is best reached at jzartler@pps.net


This Blog is the place for students to see what they have missed, and for parents to respond to the "nothing" a student responds with to the question, "What happened at school today."


There is currently NO materials fee; Thank you voters for Measure 98. Donations are generously accepted; and don't forget the Art Show in the spring. Students are required to submit a piece to the show, but they do NOT have to offer it for sale.


How Can I Help?

Be sure that your child understands the importance of being clear headed in the shop.

Contact Jamie Zartler @ jzartler@pps.net if you have any questions of concerns.

If you need something built: dog house; chicken coop; shed; or a "tiny home / office / retreat from your teen" contact Jamie and see if we can partner.

If you are cutting down a tree, some parts could be of use to the program.

Monday / Tuesday Sept. 23 / 24

Classes continue to be in different places.


BEGINING THIS WEEK GRADING BASED ON OUR CLASSROOM ETHOS AND DAILY CAREER RELATED STANDARDS (CRS) IS OCCURRING.

Be: On Time: On Budget; Work: According to Plan; Safely; Together!

Also, synergy now shows all of the machine tests and demos for the semester. The machine tests and demos for first semester are listed in first.

We are all working to be able to:

Understand how to use a drill press; including the use of "backer boards;" fences; and clamps.

Most classes have had demonstrations, and a few students have had a chance to use a bandsaw and a table saw.

Students practiced using various tools to find the center of a board: methods practiced included: measuring; use of a combo square with guess and check; intersecting arcs using a compass; and "stepping off" with a pair of dividers.

Later this week students will be asked to demonstrate proper layout and marking (as above); and set up and operation of the drill press in order to help produce the cubbyhole boards for the ceramics class. This will be an official attempt at the Drill Press Demo.

Thursday, September 19, 2019

Thursday / Friday Sept 19-20


Learning Targets today:

Reviewing the uses of the blog.

Testing the strength of various glue joints

Understanding and practicing procedures for glue ups.


Supporting notes from today:

The First Rule of Glue Ups: ALWAYS do a practice glue up (NO GLUE) ALWAYS.


"Woodworkig is the art of taking wood away in order to put wood together."

Examples include rabbets and finger joints.

Rabbeted boards (Rebates in Britain)
Finger Joints
The wood removed provides a way to "registar" the pieces together.


Wednesday, September 18, 2019

Monday-Wednesday 16-18 Septeber

Beginning classes are studying the smae topics, but are in various places and doing it in different sequences.

In other words: ALL BEGINING STUDENTS studied the following topics this week, but may have done this in a different order.

We studied what makes up wood; and how that structure is reflected in the faces of a board.


We identified the various parts of a board using our benches as examples. We also identified the "Ray Fleck" in quarter sawn boards on the bench.

We talked about how ray fleck is an important design element in Arts and Crafts and Mission style furniture like this piece:
<h4>1918 Mission Style 1/4 Sawn Oak Buffet


Given the fact that end grain is made up of the open ends of straws, it will not successfully glue, we determined the following information about gluing wood.  >>>>>>>>>>>>>>>>>>>


We then discussed the need for clamps in a glue up.


Tuesday, September 17, 2019

Intermeidate & Advanced: Monday September 16

Class discussed the following items as areas that we would focus on this year.

Class focused on identify reference surfaces on the various machines in the shop.

Friday, September 13, 2019

Wednesday/ Thursday Sept. 11/ 12

Classes generally were in different places and caught up. I will update this more soon.

Friday / Monday September 13/16

Friday: Do a good job with Mr. Winn, please. I'll be back, hopefully with a better shoulder on Monday!

Today you will be taking the test on the Drill Press. After taking that test you will fill out your Equipment Operations Test Sheet. Notice that Drill Press is first on this list. You should be proficient (that means having passed the test on Drill Press; Bandsaw; Miter Saw; and Sanders by the end of first quarter -- this will be part of your quarter grade). The planer and the table saw will be part of your first semester grade.

Earlier this week I shared my prototype tool chest as part of our discussion of Design Process.


The next one is my travel box; the tools and the holder all fit inside the tote behind it.


Today I'd like you to watch a video about tool chests by two famous woodworkers. The show is hosted by Roy Underhill "The Woodwright," Roy worked at Colonial Williamsburg for years, and has hosted the show you are going to watch for ages. He is an expert in older methods. On the video you are going to watch his guest is Christopher Schwartz. Chris annoys me sometimes, but he is amazing. He studies old woodworking to help us know how to do better woodworking today.

As you watch this video think about how the tool chest works. Try to understand how it is put together. You might draw pictures to help you think about what you might want a tool box you make to look or work. The Dutch Tool Chest on The Woodwright's Shop.

If time reamins, Mr. Winn will help you look through a "slide show" of hangers to get you thinking about what you might make starting next week.

Here is a link to the examples / prompts Examples of holders and racks

Tuesday, September 10, 2019

Monday and Tuesday, September 10 and 11

Today in class we reviewed the necessary internet contacts for success in this class:

WoodworkingGrant.Blogspot.com
Maucks.com/safety
and
jzartler@pps.net

We reviewed our classroom ethos:
On Time
On Budget
According to Plan
Safely
Together

Then, in groups we reviewed the safer operating procedures for the drill press. Students practiced hands on setting up a drill press.


Then (most) classes reviewed the concept of Design Process and took notes on it.


And students made a list of 30 things that they liked as a starting point for desiging their first project. For instance I (Mr. Zartler) like fish, and my puppies, and pizza, and flower, etc. ....


Unfortunately, I will be out of the class on Friday for a medical procedure. Mr. Winn will return as my guest teacher.


Wednesday, September 4, 2019

Thursday / Friday September 5th / 6th

Please do a good job learning with Mr. Winn today.

I am doing professional development at the Wooden Boat Festival in Port Townsend Washington

Your jobs today are to use the Chromebooks to learn about and practice:

1) What is on WoodworkingGrant.Blogspot.com and how that can help you be successful in this class.

2) What information is on Maucks.com/safety and how that information can help you be safe (a prerequisite for success) and successful in this class.

3) Working TOGETHER to learn and to problem solve.


Mr. Winn will help you number off into groups of about 3. You will be working with students who sat at different benchs.

Once you have a Chromebook you should open a window at WoodworkingGrant.Blogspot.com and see these instructions.

Next click on this linke to Maucks.com/safety . Remember that the first two machines you will need to learn to use properly and safely are The Drill Press and the Bandsaw.  When you click on these links you will notice a sample test. (My tests may be better!) Go ahead and look at the tests as a way to understand what you should be paying the most attention to during the videos. 

Remember in Woods we work Safely AND Together. The point of today's class is to help you study AND work together. It's great to talk about what you should have learned after each video.

Start with studying the Drill Press test and videos (this should take 15-20 minutes total). You may look at older entries on WoodworkingGrant.Blogspot.com while you wait for other groups to finish.

Next Mr. Winn will rearrange your groups. Be sure to share names with the new group. Then follow the same process as above to study the Bandsaw. This machine will take longer to study and you may have to complete the activities later.

Thank you.

This is the END of the Intro Woodworking Lessons


8th Period: Intermediate / Advance

This class will use the chromebooks to 1: analyze a set of three videos on the same topics and take notes on the following questions:

Why do we use push sticks? What are the qualities of a good push stick (in your opinion or from what these makers say)?

Are all techniques shown safest? If not which techniques strike you as less safe / more risky and why?

Do you see any jigs / fixtures (things like our cross cut sleds,  or saw guides) that look especially useful or interesting.


Pay attention, in particular, to her iterations in design.
Who / what companies do you think support April financially?
8:56 run time


Jay Bates – where April Wilkerson got her inspiration 4:10 run time

Video #3 This video was “suggested” by Youtube when I looked at the Bates video. The Everymaker is working in a limited shop. There are definitely some poor safety habits here. But the way he makes his star knob is worth knowing. https://www.youtube.com/watch?v=ILIdOXm0fwk
11:36 run time

Tuesday / Wednesday September 3rd and 4th

Class took notes on what wood is:

(Illustration to come).

Students also went on an indoor field trip to analyze the use of wood as a construction material in Grant. The class noted that wood was used to make a space feel more "warm" and "inviting."

Some classes were issued their hearing protection; other classes will get theirs next week.

Class on Thursday and Friday will be led by Mr. Winn. Students are reminded to have a dedicated notebook for this class labled with their name (first & last) and period and a title.